Pieps: A Case Study in Non-invasive Firmware Acquisition
In retrospect, it is often incomprehensible why one started going down a rabbit hole. No matter how I fell in, my trusty recipe for climbing back out is to write everything down in a blog post — so have fun.
This time, for some reason that is no longer entirely clear to me, I wanted to examine the firmware of my Pieps IPS Pro. Briefly, the Austrian company Pieps is a leading manufacturer of avalanche beacons, a class of personal safety devices designed to locate people buried under snow avalanches. Unsurprisingly, their main target audience are backcountry skiers.
However, for the sake of this post, the specific device does not matter all that much. I’d rather like to use the opportunity for a little case study in firmware acquisition, i.e., the process of obtaining a device’s firmware for subsequent analysis. In particular, we will focus on non-invasive firmware acquisition, as a soldering iron should be nowhere near a personal safety device that you still intend to use afterward…
Network Analysis
There are a number of simple, non-invasive techniques for obtaining a device’s firmware. In the easiest case, it is available for download on the vendor’s website. For some devices, it can also be obtained directly from the device via a web interface, shell, or removable storage medium. In our case, however, those methods do not apply.
Like many other modern consumer electronics, the IPS Pro itself offers only very limited user interaction and all management tasks are performed via a smartphone app. In such cases, another easy approach is to capture an over-the-air (OTA) update. For our device, firmware updates are performed over Bluetooth Low Energy (BLE) via the smartphone app. We can attempt to capture the update on two links: between the vendor’s backend servers and the app, or between the app and the device.
Most often, communication between the app and the backend uses standard HTTPS on port 443. To capture this traffic, we can configure a transparent HTTP(S) proxy (mitmproxy in my case) on the router that the device is using and install the proxy’s certificate on the device. As a side note, using a regular, non-transparent proxy would not work, as the app’s communication with the backend is not proxy-aware 1. Also, note that the app is not using certificate pinning, so we can save ourselves the trouble of setting up one of the Frida-based solutions to bypass it.
On the BLE side, the procedure depends on the mobile device running the app. I had an iOS device at hand so that was what I ended up using. Here, you must first install a configuration profile for extended Bluetooth logging. You also need to download the Additional Tools for Xcode; in particular, we need the PacketLogger tool. Then, we can connect the device to a Mac and start capturing Host Controller Interface (HCI) traffic. See this post for more information.
Now, we can observe network and BLE traffic during events such as app startup, account login, device pairing, or device configuration. Unfortunately, the devices I had available were all running the latest firmware 2; thus, obtaining a firmware sample that way was not possible.
App Analysis
Since waiting for the vendor to release a firmware update is boring, we can cut the wait short by analyzing the mobile app itself. After all, it must include all the logic required to download and install a new firmware image. Here, I generally prefer working with Android applications, simply because it is a much more open platform.
Android
After downloading the APK, opening it in JADX, and navigating to the main Activity we end up at the following class.
package crc64185aabf9370d726d;

[...]
import mono.android.Runtime;
[...]

/* loaded from: classes.dex */
public class SplashScreenActivity extends Activity implements IGCUserPeer {
    public static final String __md_methods = "n_onCreate:(Landroid/os/Bundle;Landroid/os/PersistableBundle;)V:GetOnCreate_Landroid_os_Bundle_Landroid_os_PersistableBundle_Handler\nn_onResume:()V:GetOnResumeHandler\n";
[...]

    private native void n_onCreate(Bundle bundle, PersistableBundle persistableBundle);

[...]

    static {
        Runtime.register("Pieps.App.Droid.SplashScreenActivity, PiepsApp.Droid", SplashScreenActivity.class, __md_methods);
    }

[...]

    @Override // android.app.Activity
    public void onCreate(Bundle bundle, PersistableBundle persistableBundle) {
        n_onCreate(bundle, persistableBundle);
    }

[...]
}
Listing: Main Activity of the Pieps Android app.
At this point I was a bit confused. Where is the application’s business logic? It took me a while to realize that the app was built using Xamarin, which is a framework to build cross-platform applications in .NET. Thus, all of the Java code that I had been looking at is just framework and glue code that exists to host a .NET runtime in the app’s process. Once you know what Xamarin apps look like, they are pretty easy to recognize in the future due to the presence of the com.xamarin.* and xamarin.* namespaces, it was just the first time that I encountered one.
With that knowledge in mind, we can also briefly explain what the above code is about. As usual, the onCreate method is called when the app is started. It wraps the n_onCreate method, which is a native method of the same class. We find a hint about where to look for the implementation of the native method in the static initializer block of the class. Here, the call to Runtime.register in combination with the class’ __md_methods field connects the onCreate and onResume methods of the C# class Pieps.App.Droid.SplashScreenActivity in the PiepsApp.Droid assembly with the corresponding native method n_onCreate and n_onResume of the SplashScreenActivity.class java class. Here, mono is the name of the .NET runtime used by the Xamarin framework (at least for Android and iOS targets).
Thus, to find the application’s business logic, one has to locate the .NET assemblies. Those are located in the assemblies/ folder at the root of the com.pieps.app.apk. This folder contains two files: assemblies.blob and assemblies.manifest. The former is a custom archive format that contains the assemblies, while the latter holds some metadata about the assemblies.
The binary format of the assemblies.blob file is described in the documentation of .NET for Android. Using this information, it is simple to create an ImHex pattern to simplify the analysis of the binary file in the ImHex hex editor.
 Image: ImHex pattern for .NET assembly stores found in Xamarin Android apps.
The assembly store contains the binary streams of all the .dlls that comprise the application. Note that some of them may be compressed and have to be decompressed to get the final PE-file. Furthermore, the store also contains the hashes of the assembly names. The mapping between names and hashes is provided by the assemblies.manifest file. With those two components we can write a small script to extract all the .NET code of the application 3.
iOS
As mentioned earlier, I usually prefer reverse engineering Android apps whenever possible. Furthermore, as the app is built with a cross-platform framework we can be pretty confident that we will find the same code in the iOS app. Nevertheless, it may be interesting to have a look at how Xamarin-based apps look on iOS.
On iOS, simply obtaining the app package is already significantly more troublesome. Fortunately, I have a few old iPhones lying around that are vulnerable to the checkm8 exploit. After jailbreaking one of them, e.g., using palera1n, one can create full file system dumps before and after installing the app. We can diff them to find out which files are created by installing the app. Following installation, two new folders appear: private/var/mobile/Containers/Data/Application/424D0CE4-7E2B-4E33-AC51-9D64D42EBEDC/ and private/var/containers/Bundle/Application/233304E0-32B7-47E5-9AA8-3001D7BFB7E9/. Note that the UUIDs will differ for each app installation. The former appears to store mutable persistent data, while the latter contains the immutable app package. In the latter folder we can find some of the .dll files that we already know from the Android app, along with some framework .dlls that seem to be iOS-specific. In contrast to the Android app, they are present as individual files without any compression. Furthermore, there is a single native MachO file PiepsAppiOS, which likely (judging by strings) contains the full Mono .NET runtime for iOS, and a PiepsAppiOS.exe that is probably the .NET entry point of the app.
.NET
Now that we’ve reached the .NET code, we need a way to analyze it. There are two popular choices for .NET decompilers that work on Linux: CodemerxDecompile and ILSpy. For some reason, ILSpy didn’t work for me. The UX of CodemerxDecompile, on the other hand, is pretty limited, especially when one is used to power tools like Ghidra. Therefore, I recommend using it solely to load all assemblies and then exporting them as a VS Code project. You can now work with this project in your favorite text editor.
Let’s start with an overview of the relevant assemblies and their functions.
PiepsApp: The cross-platform part of the app. Here is the high-level implementation of all the features observable via the UI.PiepsApp.{Droid,iOS}: The platform-specific part of the app. Things like permissions, push notifications, file access or BLE communication.LibFirmwareStorage: The app includes some firmware files along with their metadata. This assembly provides a way of querying and getting these resources.LibPiepsDevice: Handles interaction with the device.- File transfer (upload/download) via Xmodem protocol over BLE.
- Commands that can be sent to the device (bootloader or main firmware). Sending, receiving, decoding, etc.
- An interactive shell on top of the commands.
- Format of firmware files.
LibServicePortal: Interaction with the backend API.- Account management (login, logout, deletion, creation, register/unregister/list devices, info, change password).
- Email verification.
- Listing of all existing devices (including some unreleased ones :) …).
- Query metadata about available firmwares for each existing device.
- Download of firmware files (including development firmwares :) …).
- Caching of API responses.
That’s a lot of interesting stuff… However, since our goal is obtaining firmware, let’s stay focused on that for now.
Firmware Download
First of all, the app already includes some firmwares as resources of the LibFirmwareStorage assembly. However, at this stage, we are no longer satisfied with some firmware files — we want ALL of them, including the ominous “development” firmwares.
By reading the code in Pieps.ServicePortal.Services.PortalService, we can get an idea of how the API works. To download all firmwares, both development and release versions, we can proceed as follows:
- Log in by sending a POST request with the URL-encoded username and password to
/Token. This returns an access token to use in subsequent requests. - Get the list of all known products by sending a GET request to
/api/devicetype?registrationOnly=false. This returns an array of products that look like this:[ [...] { "DeviceTypeID": 110, "Name": "PIEPS PRO IPS", "DeviceCategoryID": 1, "FirmwareRelease": "1.2.0.0", "FirmwareUrl": "Firmware/LVS/ProIPS/info.json", "BetaRelease": "LVS6SW.json", "BetaUrl": "ProIPS", "RequiredRelease": null, "RequiredUrl": null, "ProductUrl": null, "FAQUrl": null, "BD": null, "HasBT": true, "ServiceActive": true, "Order": 8, "CanRegister": true, "UnReleased": false }, [...] ]Listing: Device entry in the array returned by
devicetypeendpoint. - We can now retrieve information about the available development firmwares by sending a GET request to
/api/firmware/development/file/{BetaUrl}/{BetaRelease}. This gets us an array of firmware versions like this:[ [...] { "Version": "1.2.0.0", "Files": [ "LVS6_V1.2.0.0.pfw" ], "Description": "Public release" }, [...] ]Listing: Firmware entry in the array returned by the beta endpoint for the IPS Pro.
- Finally, we can download the individual files via a GET request to
/api/firmware/development/file/{BetaUrl}/{Files[i]}.
Note that there are some older products for which the firmware is hosted in Azure cloud storage instead. It’s now trivial to write a script to download all available firmware versions.
Now that we have downloaded the firmware, let’s dive into analyzing its structure.
Firmware Analysis
Firmwares are stored in the custom .pfw container format, I guess that stands for Pieps Firmware. Luckily there is a parser for this format in Pieps.PiepsDevice.File.PiepsFirmwareHeader. Thus, we can write another ImHex pattern, this time for .pfw files.
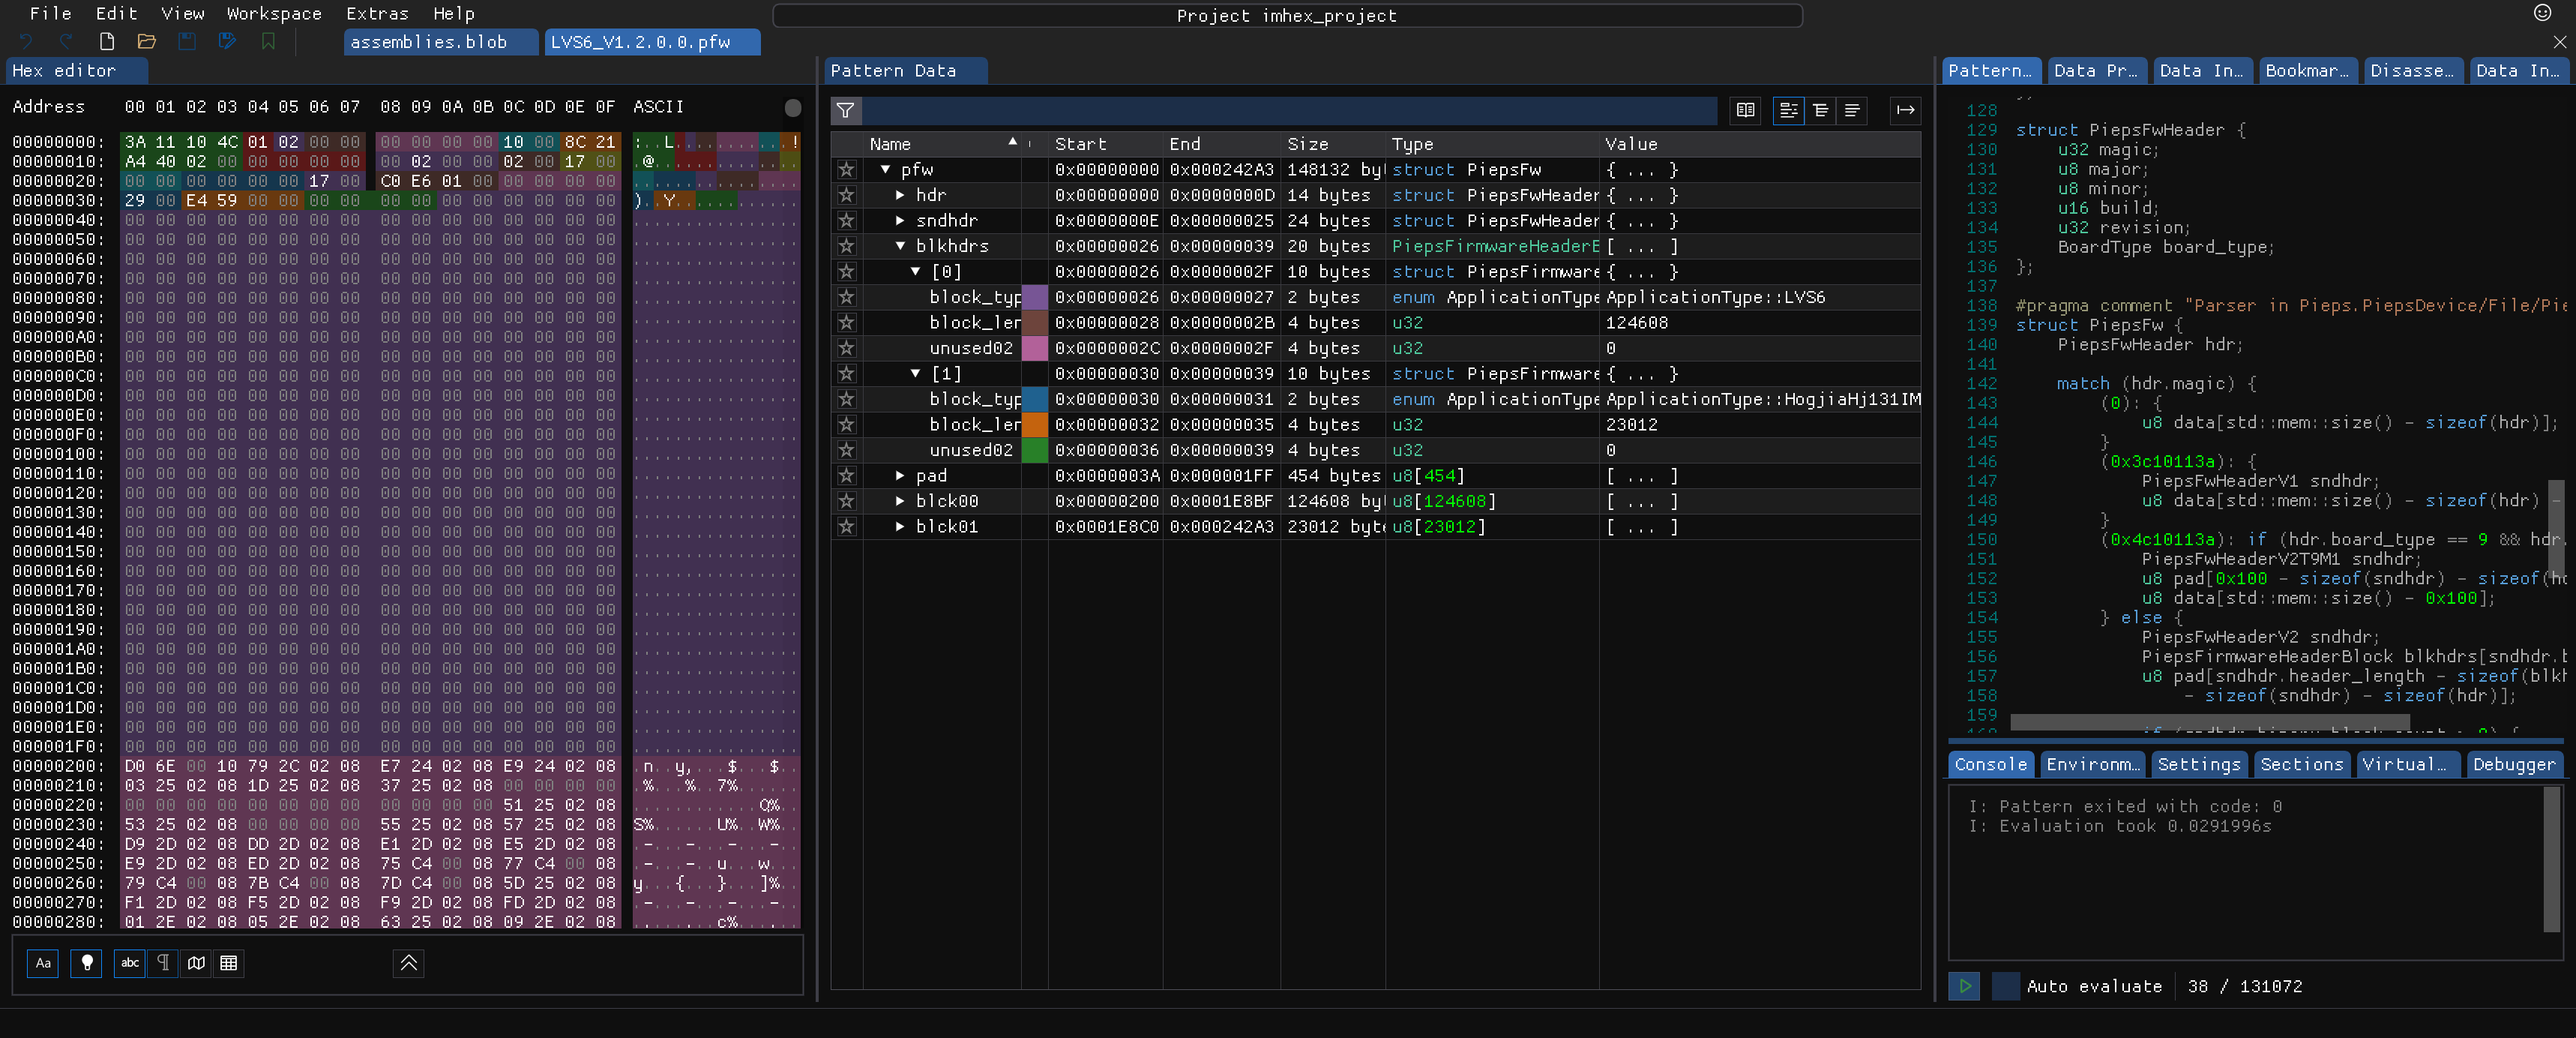 Image: ImHex pattern for Pieps firmware (pfw) files.
There are like three and a half versions of this format. They always start with a common primary header. Our device of interest is using a format where this header is followed by a secondary header, which is followed by a variable number of block headers. Next comes some padding, followed by the actual blocks.
In this case, there are two blocks. The first is a ~124KiB block of application type LVS6, the internal name for our device. Then a ~23KiB block of application type HogjiaHj131IMH. The latter is probably referring to a tiny BLE chip by HongJia.
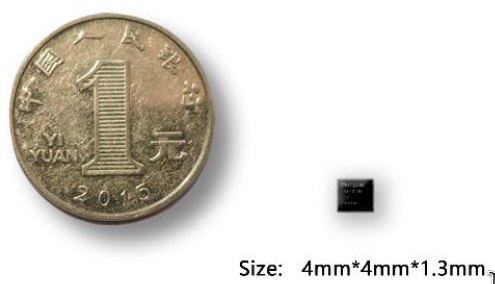 Image: Size comparison between a coin and the BLE chip used by the Pieps IPS Pro.
We can thus conjecture that there are two firmware payloads in the given container, one for the main SOC and one for a separate BLE controller. Thus, individual blocks of the pfw file contain separate firmwares.
To determine the CPU architecture we can throw the CodeScanner or coderec on the file. We can conclude that both chips are most likely ARM-based.
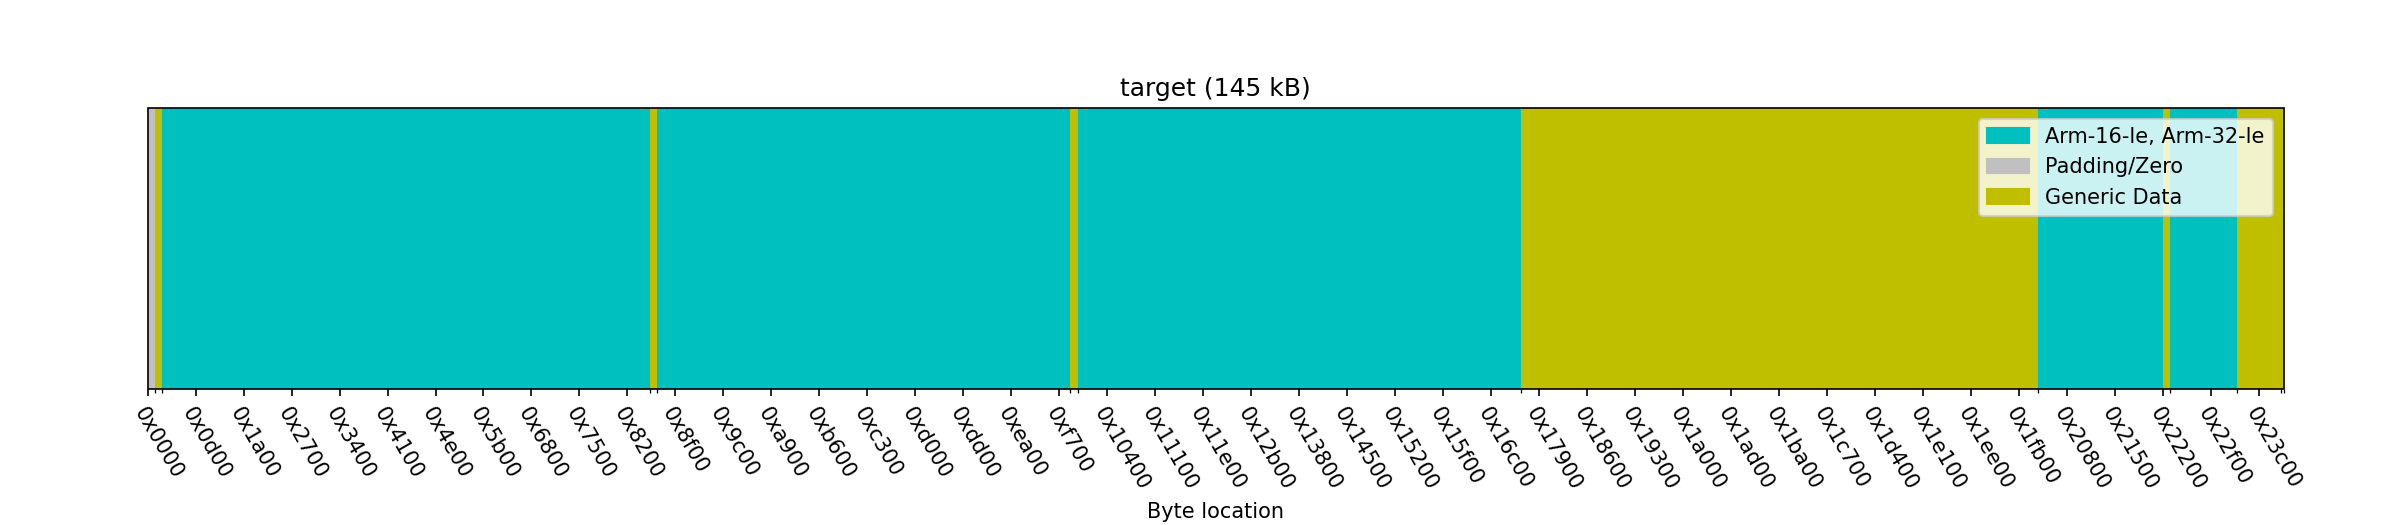 Image: CodeScanner result on LVS6_V1.2.0.0.pfw.
The next step would be to extract the individual blocks and load them into your preferred decompiler, but we’ll save that for a future post.
Conclusion
In this post, we went from knowing nothing about the device and searching for a single firmware, to obtaining all of the vendor’s development firmwares for all its devices. We also uncovered unpublished devices (and their firmwares) through the API, and discovered traces of a BLE-based shell that exposes many interesting functionalities 4.
Especially the shell looks interesting, but getting this one running is something for another post.
-
This is, of course, not a priori clear, and I only found this out by first setting up a regular HTTP(S) proxy and not seeing any interesting traffic. ↩
-
It is usually a good idea to have the capture setup running before the initial connection — just not this time. ↩
-
Yes, I realized there are already tools to do this, but I love to reinvent the wheel. ↩
-
Why the heck is this even part of the release app? ↩